Recipes by Colin Asuncion. Follow him on TikTok and YouTube

Magic Bubble Sugar Cookies
Ingredients
For Sugar Cookies:
- 1 cup room temperature unsalted butter
- 1 cup granulated sugar
- 1 teaspoon vanilla extract
- 1 room temperature large egg
- 2 teaspoons baking powder
- ½ teaspoon salt
- 3 cups all purpose flour, plus more for dusting work surface
- Optional mix-ins:
- 1 teaspoon each of ground cardamom, cinnamon, and ginger
- Poppyseeds
- Sesame seeds
- Citrus zest
For royal icing and decoration:
- 4 cups (about 1 lb.) powdered sugar (confectioners’ sugar)
- 6 - 12 tablespoons warm water
- 3 tablespoons meringue powder
- Gel food colouring for decorating
- Sprinkles, edible glitter, edible paint, and other decorations
Directions
- Preheat oven to 350°F. Set rack at middle position. Line baking sheet with parchment paper.
- Using a hand mixer or stand mixer with the paddle attachment, cream butter and sugar together until smooth, at least 3 minutes.
- Add vanilla extract and egg and beat for another minute.
- In a separate bowl, combine baking powder, salt, flour, and mix ins (if adding). Whisk until well combined.
- Add dry ingredients to wet ingredients and mix on medium until well incorporated and a dough forms and comes together.
- Turn out dough onto a floured surface and knead for a few seconds. Dough should hold together easily.
- Roll out and cut circle shapes with cookie cutters. Carefully transfer cookies onto a baking sheet. If cutting out cookies in different sizes, place similarly sized cookies on the same baking sheet so you can control bake time for each size.
- Bake for 13-16 minutes until edges are slightly golden. Bake time will vary depending on the size of your cookies, so monitor this closely.
- Remove from oven and cool on a rack while you prepare your royal icing.
- Beat powdered sugar, water, and meringue powder together until stiff peaks form — 7–10 minutes on low speed with a stand mixer, or 10–12 minutes on high speed with a hand mixer.
- Adjust consistency as needed: Too stiff? Add water, 1 tsp at a time. Too thin? Add powdered sugar gradually.
- For dipping consistency, add 1 tsp water per cup of icing. Stir slowly with a grease-free utensil in a figure-8 motion. Add ½ tsp water at a time if needed.
- Do the 5-second test: Take a small amount of icing on a spatula and let it fall back into the bowl. If the surface smooths out after a full count of 5 seconds, it’s the right consistency for dipping.
- Let icing sit for 10 minutes to release air bubbles. Divide icing into separate bowls and add gel food colouring to each. For Glinda bubble cookies, we need pink, purple, and blue icing.
- In a medium sized bowl, swirl together a few colours of the icing just until they are slightly marbled. Do not over mix. Dip each cookie into the icing and shake off the excess. Refill the dipping bowl of icing as needed.
- Add sprinkles and other desired decorations to your iced cookies while they are still wet. Let them dry for at least 5 hours to harden completely. Once the icing has hardened, you can apply edible glitter or edible paint.
Baker’s Tips:
- The dreamy marbled look is achieved by gently mixing a few colours of royal icing in a large bowl and then dipping the cookie into the marbled icing. Keep towels handy—your fingers will get messy.
- Do not overmix the colours or the marbled look will be lost.
- You can customize these sugar cookies with different mix-ins: citrus zest, sesame seeds, spices, different extracts - the world is your oyster!

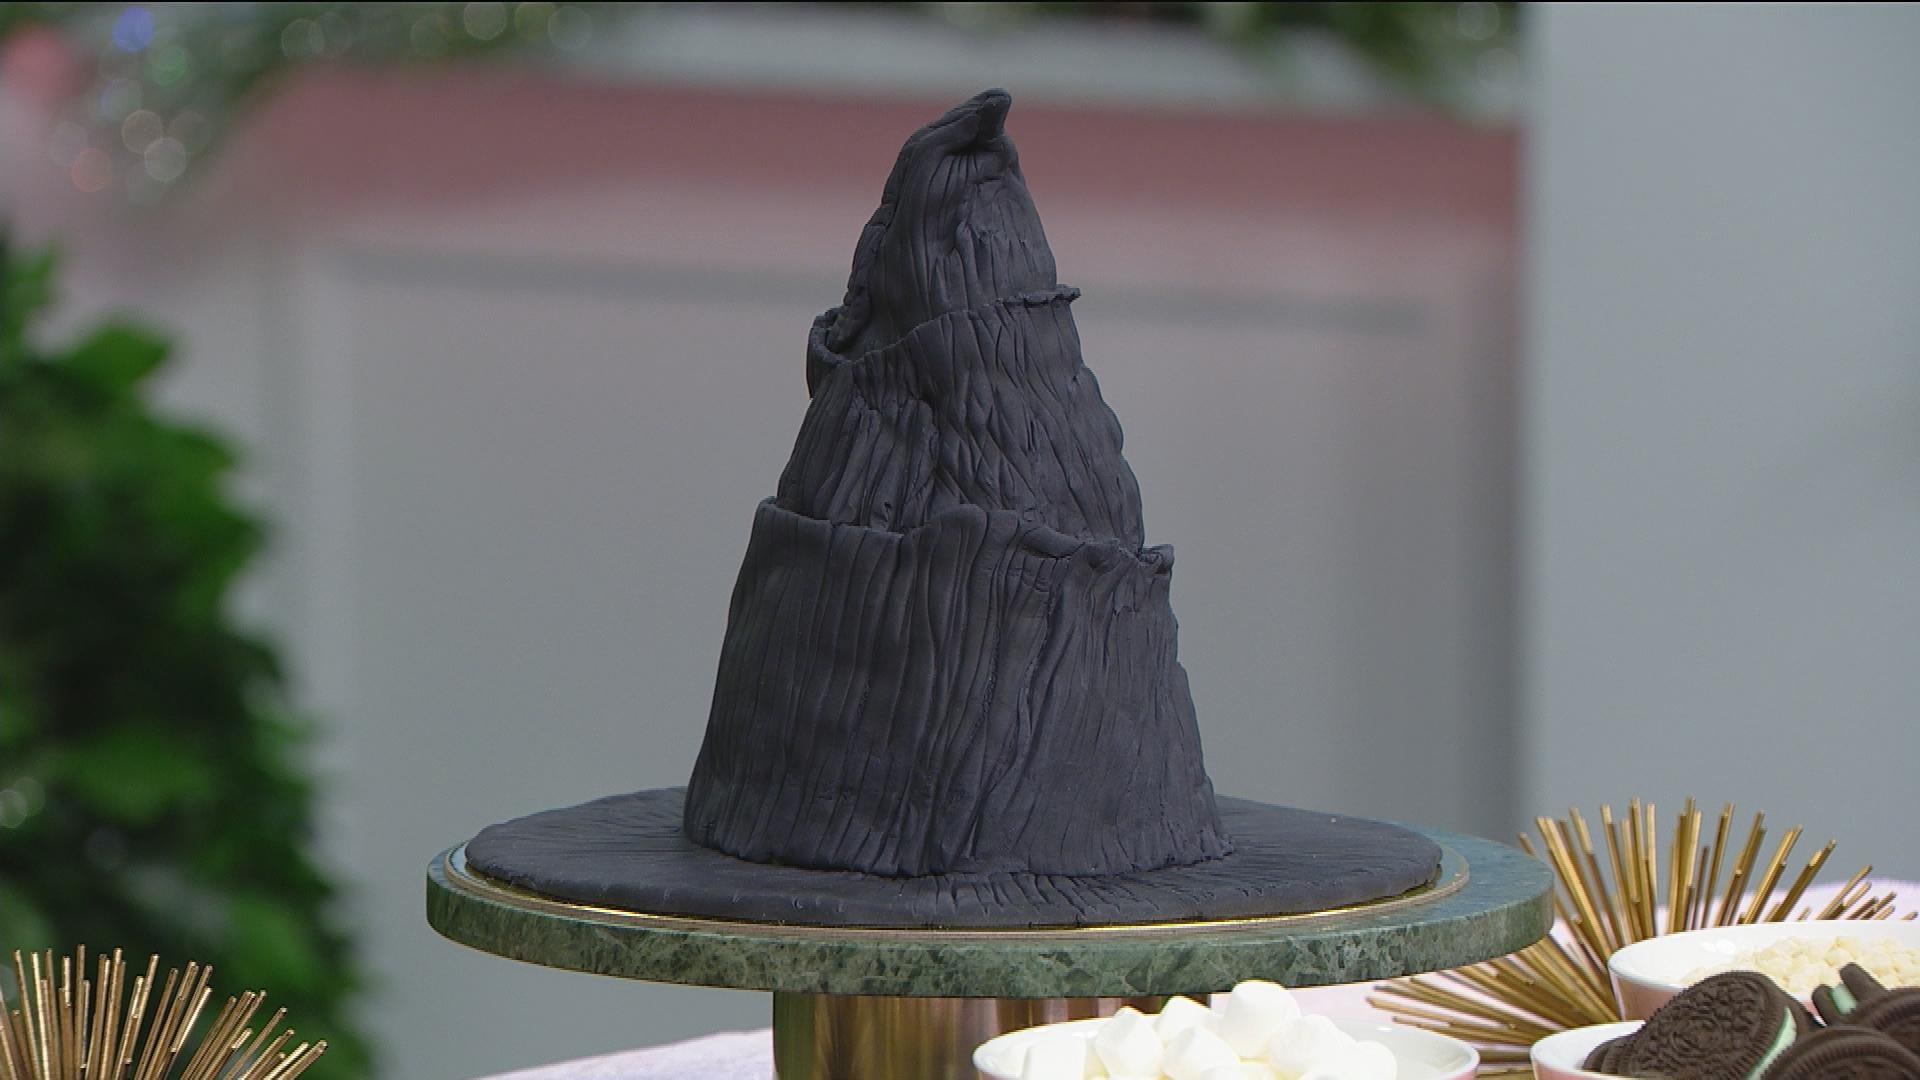
Elphaba’s Hat Treat
Ingredients
- 1 package black fondant
- Icing sugar (for rolling out fondant)
- 6 tablespoons salted butter (¾ stick)
- 16 ounces mini marshmallows
- 5 cups puffed rice cereal
- 1 teaspoon pure vanilla extract
- 20 mint chocolate sandwich cookies (Oreos, or another brand)
- Green gel food colouring
- Nonstick cooking spray
Directions
- Make a cone out of aluminum foil. This will form the body of the witch hat and should be approximately 9 inches tall, and 5-7 inches in diameter at the base. Use 2 - 3 layers of foil to ensure the cone is sturdy. Spray the interior with nonstick cooking spray, and rest it inside a large bowl, pointed side down.
- Melt the butter in a pot over low heat.
- Add in half of the marshmallows. Continue to cook on low heat for a few minutes or until melted, while stirring frequently. Add a few drops of green gel food colouring until it is a rich emerald green. Pour the rice cereal and vanilla extract over the marshmallow and butter mixture and stir until almost completely combined.
- Remove the mixture from the heat and fold in chopped mint chocolate sandwich cookies and the second half of the marshmallows until evenly distributed throughout the mixture.Pour the mixture into your foil cone and let it sit until it cools completely and is firm to the touch. If you have excess, you can pour it into a small greased loaf pan for extra treats.
- Roll out your fondant into a large sheet: First lightly dust your clean, flat work surface with icing sugar to prevent sticking. Next, knead the fondant until it’s pliable, then roll it out to about an eighth of an inch thick, lifting and rotating it frequently to maintain shape and prevent sticking. Cut out a large circle from your fondant sheet to form the base of the witch hat. It should be a few inches wider than your cone of crisped rice marshmallow treat. Place this on a cake board or directly onto your serving platter.
- Peel off the aluminum foil from your crisped rice marshmallow treat mixture. Place the cone of crisped rice marshmallow treat in the middle of the fondant circle. Take the remaining sheet of fondant and cover the cone with it (you may need to knead and re-roll the remaining fondant to have a nice clean sheet to work with). Using scissors or a sharp knife, trim off any excess fondant. Press it firmly onto the surface of the rice marshmallow treat mixture and begin to sculpt the surface into your desired look. You can use specialty fondant tools to sculpt the fondant, or common kitchen tools like knives, toothpicks, skewers, forks, and spoons. Be creative and have fun with the sculpting process.
- For extra dimension, you can paint or spray on edible paint or glitter once your hat is fully sculpted. Serve within 3 days for optimal flavour and freshness.
Tips for working with fondant:
- Dust your work surface with cornstarch or icing sugar to prevent sticking (similar to how you would dust your counter with flour before rolling out cookie dough.)
- You can use special fondant tools to sculpt the surface of your fondant, or you can use common kitchen items like toothpicks, forks, knives, spoons, skewers, etc.

Yellow Brick Road Sheet Cake
Ingredients
For Yellow Brick Road Cookies:
- 1 cup room temperature unsalted butter
- 1 cup granulated sugar
- 1 teaspoon vanilla extract
- 1 room temperature large egg
- 2 teaspoons baking powder
- ½ teaspoon salt
- 3 cups all purpose flour, plus more for dusting work surface
- Yellow food colouring
For Citrus Poppyseed Cake:
- 2 ¼ cups all-purpose flour
- 1 tbsp baking powder
- ½ tsp salt
- 3 eggs
- 1 ¾ cups sugar
- 1 tsp vanilla extract
- 2/3 cup canola or vegetable oil
- 1 cup lukewarm whole milk
- Finely grated zest of two lemons and two limes
- ⅓ cup poppyseeds
For Mock Swiss Meringue Frosting:
- 3 cups unsalted butter
- 5 3/4 cups icing sugar
- 170g egg whites, pasteurized
- 1/2 tbsp vanilla extract
- Pinch of salt
- Gel food colouring in various colours for grass and poppies
Directions
- Make cookies: Preheat oven to 350°F. Set rack at middle position. Line baking sheet with parchment paper.
- Using a hand mixer or stand mixer with the paddle attachment, cream butter and sugar together until smooth, at least 3 minutes.
- Add vanilla extract and egg and beat for another minute.
- In a separate bowl, combine baking powder, salt, and flour. Whisk until well combined.
- Add dry ingredients to wet ingredients and mix on medium until well incorporated and a dough forms and comes together.
- Turn out dough onto a floured surface and knead for a few seconds. Dough should hold together easily.
- Roll out and cut yellow brick shapes with a knife. Carefully transfer cookies onto a baking sheet. If cutting out cookies in different sizes, place similarly sized cookies on the same baking sheet so you can control bake time for each size.
- Bake for 10-14 minutes until edges are slightly golden. Bake time will vary depending on the size of your cookies, so monitor this closely.
- Remove from oven and cool on a rack while you prepare your cake.
- Make cake: Grease a 9x13 baking pan with nonstick cooking spray and line with parchment paper. Reduce oven temperature to 325 degrees.
- In a bowl, combine the flour, baking powder and salt. Set aside.
- In another bowl, beat the eggs, sugar and vanilla at high speed with an electric mixer for about 10 minutes or until the mixture triples in volume and forms a ribbon. Drizzle in the oil while beating.
- At low speed, add the dry ingredients alternately with lukewarm milk, beating just until smooth. Fold in poppyseeds and citrus zest. Mix gently until evenly incorporated. Pour the batter into the pan.
- Bake for 40-43 minutes or until a toothpick inserted in the centre of the cake comes out clean. Let cool for 15 minutes. Unmould and let cool completely on a wire rack.
- Make frosting: In a stand mixer fitted with a whisk attachment, beat pasteurized egg whites and powdered sugar for about 5 minutes, until shiny and fluffy.
- Add vanilla extract and salt. Whisk briefly to combine.
- With the mixer on low-medium speed, gradually add cubed, room-temperature butter, making sure each piece is fully incorporated before adding the next.
- Increase the speed to medium-high and whip for 15–20 minutes, pausing occasionally to prevent the mixer from overheating.
- The buttercream is ready when it’s white, glossy, and no longer tastes like butter. Divide your frosting into separate bowls and dye with your food colouring.
- Time to decorate your cake! Start by covering the cake in a thin layer of green frosting, then pipe on poppies, grass, and whatever else you like. Finish by laying down your yellow brick road cookies until your desired look is achieved.
- Slice and serve!
Baker’s Tip:
- This is a single layer cake, but if you wanted to include a filling, you can absolutely do so by cutting the cake in half with a sharp serrated knife and then spreading your desired filling on top. Some filling ideas: lemon curd, jam, whipped cream, cream cheese frosting, or more of the Swiss meringue buttercream which is on top of the cake.

Black Sesame Tornado Cookies
Ingredients
- 1 cup unsalted butter, room temperature
- 1 cup icing sugar
- 1 teaspoon vanilla extract
- 2 cups all purpose flour
- ¼ teaspoon salt
- 2 tablespoons black sesame powder
- 1 - 2 tablespoons milk
- Black gel food colouring (optional)
- Edible glitter (optional)
- Edible paint (optional)
Directions
- Preheat oven to 350 degrees F.
- Place the butter, confectioner’s sugar and vanilla in a large bowl, and beat with an electric mixer until light and fluffy.
- In a separate bowl, whisk together flour, salt, and black sesame powder. Add this mixture to the butter mixture and beat until a crumbly mixture forms.
- Add 1 tbsp of milk and beat until the dough comes together. If the dough looks too dry or clumpy, add more milk until it is smooth and pliable, similar to playdough. You can add gel food colouring at this point to colour your dough. If you are colouring your dough, make it grey and not black, so you can still check for browning when baking.
- Add the dough to a piping bag fitted with a star tip. Pipe a tornado shape (a squiggle that starts wide and eventually gets smaller to a sharp point) onto a parchment-lined baking sheet, leaving at least one inch between cookies.
- Bake the cookies for 15 minutes or until fragrant and lightly browned. Remove from oven and let cool completely before decorating with edible glitter or edible paint, if desired.
Baker’s Tips:
- Regular shortbread dough is too stiff to pipe, but this dough has a bit of milk in it to make it softer, allowing you to fill a piping bag with it and pipe out a tornado shape.
- If the dough looks too dry or clumpy, add more milk until it’s smooth and pliable. You want a consistency similar to playdough.
- You can find black sesame powder in most Asian grocery stores, but if you can’t find it, take black sesame seeds and blitz them in a food processor or coffee grinder.
- If you don’t want to use black sesame, you can use black tea powder, or even plain shortbread dough and just use black gel food colouring for the grey colour.

Green Elixir
Ingredients
- Iced green tea
- Pineapple juice
- Ginger beer
- Green food colouring
- Lime wedges
- Green sanding sugar (optional)
Directions
- Pour a thin, even layer of green sanding sugar onto a small plate. Run a lime wedge around the rims of your drinking glasses (about ¼ inch down the outside). Gently dip the moistened rim into the sugar, twisting slightly to coat evenly.
- In a pitcher, combine equal parts iced green tea, pineapple juice, and ginger beer. Stir to combine.
- Add a few drops of green food colouring and mix well. Add more food colouring until your desired greenness has been achieved.
- Pour the elixir into your prepared glasses and enjoy!
Make it a Cocktail:
You can definitely add alcohol to this drink, but be sure to use a light coloured or clear spirit so it’s easy to colour green.