
Recipes by Gavan Knox. Follow him on Instagram and TikTok.
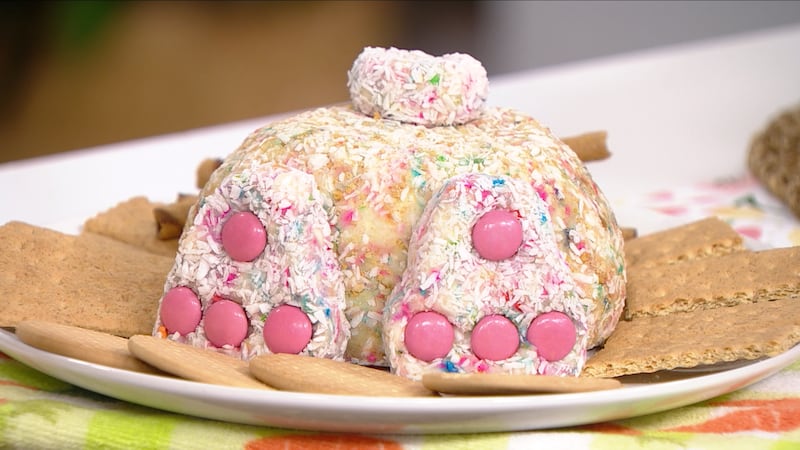
Bunny Butt Dip
Serves 6-8
Ingredients
- 16 oz full-fat cream cheese
- ¾ cup sprinkles
- 1 cup white chocolate chips
- ¼ cup sugar
- 1 cup Funfetti cake mix*
- 1 teaspoon vanilla extract
- 14 oz coconut flakes
- 8 pink coated candies
- To serve: Graham crackers; pretzels; crackers to your liking
Directions
- In a mixing bowl, combine the cream cheese, sprinkles, white chocolate chips, sugar, and baked Funfetti cake mix*.
- Knead the mixture with your hands until all ingredients are thoroughly combined.
- Divide the mixture into one large ball, two medium-sized balls, and one small ball.
- Roll each ball in coconut flakes, ensuring they are completely coated.
- Assemble the bunny butt by using the two medium-sized balls as feet and the small ball as a tail.
- Flatten and shape the feet gently with your hands.
- Use the pink coated candies to create pads on the feet.
- Refrigerate the bunny butt dip or serve it immediately.
- Serve with crackers or pretzels to your liking.
*Before using the cake mix here I recommend heat-treating it first. Preheat your oven to 350°F. Spread the Funfetti cake mix on a lined baking sheet and bake it for 5 minutes to ensure safety, or microwave it in 30-second intervals, stirring each time until it reaches 160°F. Leave to cool before using.
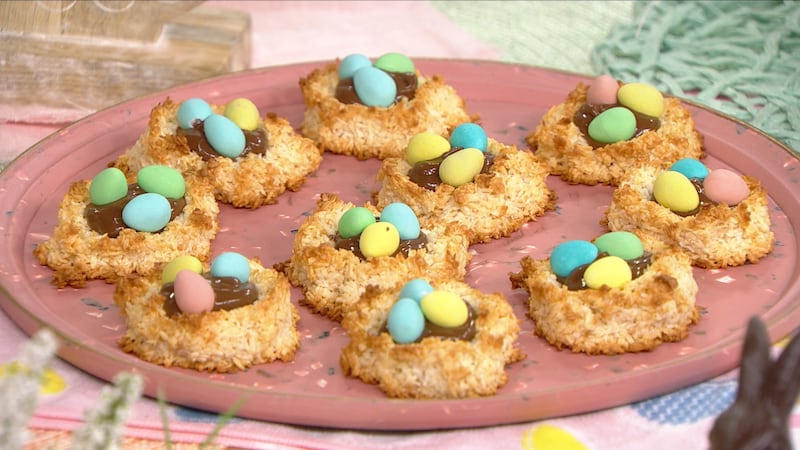
Coconut Nest Macaroons
Serves 12
Ingredients
- 2/3 cup sweetened condensed milk
- 1 large egg white
- 1 1/2 teaspoons vanilla
- 1/8 teaspoon salt
- 3 1/2 cups sweetened coconut
- 1 cup chocolate spread
- Chocolate candy eggs
Directions
- Preheat the oven to 325°F. Line a large baking sheet with parchment paper.
- In a large bowl, whisk together the sweetened condensed milk, egg white, vanilla extract, and salt. Stir until combined. Add in the coconut and mix well.
- With a spoon, or cookie scoop, scoop up about 2 Tablespoons of the coconut batter and place onto the prepared baking sheet. Form the cookies into the shape of a bird nest, pressing down the centre with your thumb.
- Bake cookies for 17 to 20 minutes, or until golden brown, with some darker spots in places. Remove from the oven and press your thumb down in the centre of the nests again - carefully, they will still be a bit hot!
- Cool the cookies on the baking sheets for about 5 minutes or until they are firm and set. Remove with a spatula onto a cooling rack. Cool completely.
- Pipe about a tablespoon of chocolate spread in the centre of each nest. Place 3 egg candies in the centre of the nest. Finish decorating the remaining nests and serve.
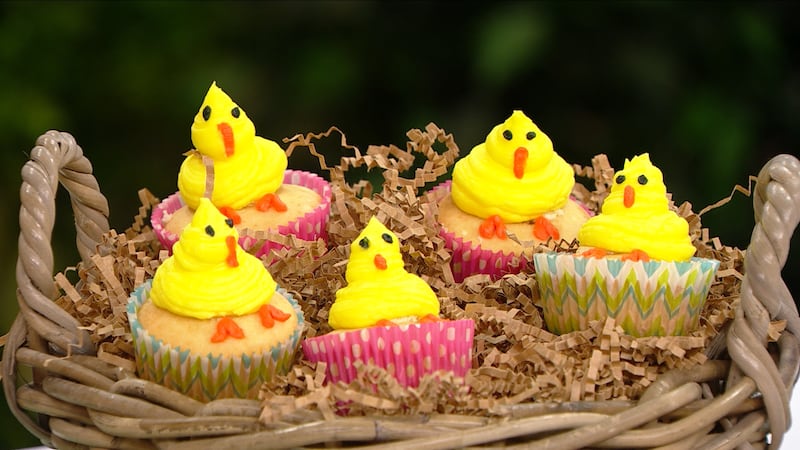
Easter Chick Cupcakes
Serves 12
Ingredients
Cupcakes
- 1 ¾ cups cake flour
- ¾ teaspoon baking powder
- ¼ teaspoon baking soda
- ¼ teaspoon salt
- ½ cup (8 Tbsp) unsalted butter, softened to room temperature
- 1 cup granulated sugar
- 3 large egg whites, at room temperature
- ½ cup full-fat sour cream at room temperature
- 2 teaspoons pure vanilla extract
- ½ cup whole milk at room temperature
Frosting:
- 1 cup (16 Tbsp) unsalted butter, softened to room temperature
- 4 – 5 cups powdered sugar (see note)
- 1/4 cup heavy cream, at room temperature
- 2 teaspoons pure vanilla extract
- 1 tsp lemon extract
- yellow food colouring
- orange food colouring
- black food colouring
Filling:
- 1 cup lemon curd
Directions
Cupcakes:
- Preheat the oven to 350°F. Line a 12-cup muffin pan with cupcake liners. Set aside.
- In a medium bowl, whisk the cake flour, baking powder, baking soda, and salt together. Set aside.
- In a large bowl using a handheld or stand mixer fitted with a paddle attachment, beat the butter and sugar on high speed until light and creamy, about 3 minutes. Scrape down the sides of the bowl as needed.
- Add the egg whites, vanilla extract, and beat on high speed until smooth and well combined, about 2 minutes. Add the sour cream and beat on medium-high speed until combined, about 1 minute
- With the mixer running on low speed, add the dry ingredients, and then slowly pour in the milk and beat just until combined. Do not over-mix. You may need to whisk it by hand a few times to make sure there are no lumps at the bottom of the bowl. The batter will be slightly thick. Pour/spoon the batter into the liners—fill only 2/3 full to avoid spilling over the sides.
- Bake for 19–22 minutes, or until a toothpick inserted in the centre comes out clean. Cool the cupcakes in the pan set on a cooling rack for 20 minutes, then remove them from the pan and return to the rack to cool completely before frosting.
- While the cupcakes are cooling, prepare the frosting.
- When the cupcakes have fully cooled use a cupcake corer, or knife to create a hole in each cupcake for filling (do not go all the way through!)
- Fill each cupcake by piping between 1-2 teaspoons of lemon curd into the hole, ready to be sealed with the frosting.
Frosting:
- In the bowl of a stand mixer fitted with a paddle attachment, beat the butter on medium speed until creamy, about 2 minutes. Add 4 and 1/2 cups confectioners’ sugar, the heavy cream, and lemon extract. Also add in the yellow food colouring and beat until the buttercream is yellow “chick” colour to your liking. Beat on low speed for 30 seconds, then increase to medium-high speed and beat for 2 full minutes. Taste. Add a pinch of salt if frosting is too sweet.
- Adjust if needed: You can control the consistency at this point—add up to 1/2 cup more confectioners’ sugar if frosting is too thin or more heavy cream if frosting is too thick (add only 1 Tablespoon at a time, beat together, then taste and add more if desired).
- Remove a small spoonful and colour this with the orange food colouring (again, you may only need a tiny amount) - until you reach a beak/foot colour. Take another small spoonful and colour this black for the beaks.
- Add the yellow buttercream to a large piping bag with a jumbo round nozzle in, and add the orange and black buttercream to two small piping bags with small round nozzles in, or the ends snipped off.
- On each cupcake, pipe a larger ‘ball’ of buttercream, by piping directly downwards- this will be your chick body. Lift off the piping tip and then pipe another ‘ball’ of buttercream on top, but slightly small than before to create the chick head.
- Once this is done, use the orange and black colours to make the eyes, beaks, and feet for the chicks.
- Serve and enjoy.

Carrots on Soil
Serves 8
Ingredients
Soil:
- ¼ cup butter; melted
- 1 cup granulated sugar
- ½ cup cocoa powder
- 1 pinch salt
- Optional: chopped slivered almonds; chopped walnuts, or pecans; shaved dark chocolate; shaved milk chocolate
Carrots:
- 2 store-bought frozen puff pastry sheets (333 grams)
- 1 egg
- Water
- orange colour melting wafers
- orange sanding sugar
Filling:
- 1 ½ cup whipping cream, cold
- 2 tablespoons instant vanilla pudding mix
- ¼ cup powdered sugar
- 1 teaspoon vanilla extract
- 1/8 teaspoon salt
To Finish:
- Fresh mint sprigs
- Chopped pecans
Directions
Soil:
- Melt butter in your microwave in a small glass or ceramic bowl (microwave safe) and allow to cool to room temperature.
- In a large mixing bowl, blend the sugar, salt and cocoa powder until thoroughly mixed.
- While whisking, slowly add the melted butter and continue mixing gently until blended, but dry.
- Using a fork, continue mixing until it looks like dark soil.
- At this stage mix in additional chopped nuts, chocolate shavings etc to give the soil texture.
Carrots:
- Thaw your pastry in accordance with packet instructions, roll out to 3-4mm thickness.
- Pre-heat the oven to 350F.
- Line a baking tray with baking parchment and lightly grease/ oil 8 cream horn moulds*.
- Cut both the pastry sheets into 2cm wide strips using a sharp knife.
- Using a pastry brush and some cold water, moisten the long edge of a pastry strip.
- Starting at the point of the cone, gently wind the pastry strip around the cone (taking care not to stretch or damage the pastry and overlapping the strip with the previous layer). The moistened edge should help hold the overlapping parts of the pastry together.
- If you need more than one strip for each horn you can join the end of one strip to the start of another with a little water and keep winding.
- You should finish at least ½cm before the end of the mould (otherwise they will be hard to remove once cooked). Keep repeating until you have eight. Tip: When finishing off the last pastry strip, wind the pastry so that it meets with the previous layer, forming a circle at the top of the horn rather than seeing the short edge of the strip.
- Whisk one egg with a teaspoon of water and brush each pastry lightly and evenly with the egg wash.
- Place horns at least 2 cm apart on the greased baking tray, making sure you place the pastry join side down on the baking sheet.
- Bake for 20 minutes and remove from oven.
- Allow to cool a little (about 5 minutes) so that you can remove the horns from the moulds, by a slight gentle twist.
- Place all the horns back on baking tray and bake for another 5-10 minutes or until a golden colour. Allow to cool completely on a wire rack before decorating and filling.
- Decorating: Melt your orange candy wafers and the drizzle over the pastry carrots to creating orange highlights. While the melted candy is still wet, sprinkle light with the orange sanding sugar. Allow to set fully before filling.
Filling:
- In a chilled bowl combine all the filling ingredients.
- Whisk, either by hand or with an electric whisk, until stiff peaks form, be careful not to over whisk.
- Transfer the whipped cream to a piping bag with a nozzle fitted to you liking. Keep the whipped cream mixture chilled until ready to fill.
- When ready to serve, pipe into your cooled pastry carrots until filled. (For best results fill just before serving).
To finish:
- Dip the cream ends of the carrots into chopped pecans and place a sprig of mint in each for the carrot top greens. Arrange on a serving plate with the chocolate dirt. Serve and enjoy!
*NOTE: If you don’t have cream horn moulds, you can use aluminium kitchen foil. Tear off 8-12″ long sheets of aluminium foil, fold in half, and roll each into a cone shape. Again brush with oil before use.
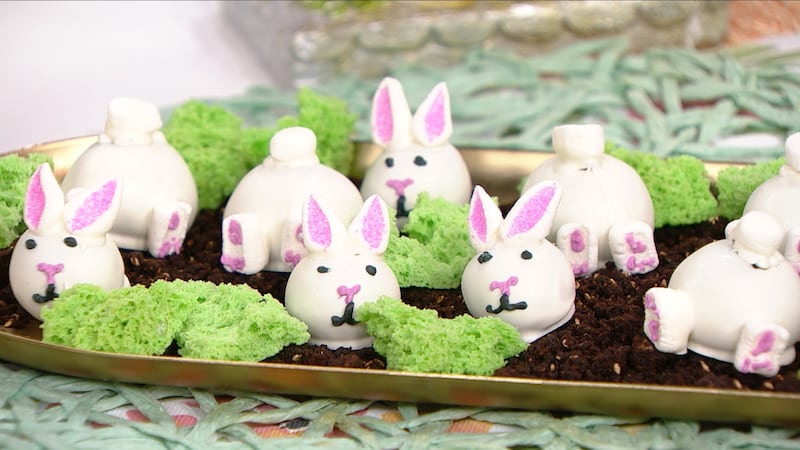
Bunny Truffles
Serves 36
Ingredients
- One x14.3-oz pack chocolate sandwich cookies (about 36 cookies)
- 6 oz cream cheese, softened
- 3/4 cup powdered sugar
- 3/4 teaspoon meringue powder (available in the baking aisle)
- Pink gel food colouring
- Black gel food colouring
- 2 cups white candy melting wafers (about 13 ounces)
- 1 teaspoon refined coconut oil
- Pink sanding sugar, for decorating
- 45 mini marshmallows
Directions
- Line 2 rimmed baking sheets with parchment paper.
- Pulse the cookies in a food processor to fine crumbs. Add the cream cheese and pulse together until the mixture begins to ball up. Transfer to a large bowl and knead together a few times until completely combined.
- Roll about 1/3 of the mixture into 18 truffles (about 1 level tablespoon each) and place on one of the prepared baking sheets. Roll the remaining mixture into 18 larger truffles, (about 1 heaping tablespoon each), and place on the second prepared baking sheet. Refrigerate until firm and chilled through, about 1 hour.
- While the truffles chill, prepare the decorations.
- For the royal icing, combine the confectioner’s sugar and meringue powder in the bowl of a stand mixer fitted with a paddle attachment. Beat on low speed just to combine. Add 2 1/2 teaspoons water and increase the speed to medium. Beat the mixture until the icing is stiff enough to hold a peak but soft enough to pipe, about 2 minutes. If the icing gets too stiff, add up to 1/2 teaspoon more water.
- Divide the icing evenly between 2 bowls. Tint one bowl of icing bright pink using the pink food colouring. Tint the remaining bowl of icing with the black food colouring. Transfer the pink and black icings to separate piping bags (with no cut openings) or to resealable plastic bags and set aside.
- For the white coating, combine the candy melting wafers and coconut oil in a medium microwave-safe bowl. Microwave the mixture in 20-second intervals, stirring between each, until the wafers are melted and the mixture is smooth, about 1 minute 20 seconds. Set aside.
- Put the pink sanding sugar in bowl and set aside.
- For the bunny tails: Cut 9 of the marshmallows crosswise to create 18 halves and set aside. These will be the bunny tails.
- For the bunny ears: Cut 18 of the marshmallows in half on the diagonal to create 18 pairs of bunny ears. Dip the cut side of each marshmallow piece in the pink sanding sugar. Place sugar-side up on the plate with the tails to set.
- For the bunny feet: Cut the remaining 18 marshmallows in half lengthwise to create 18 pairs of feet. Set aside on the plate with the tails and ears.
- Put a truffle in the white coating and use 2 forks to evenly coat. Lift out the truffle, letting any excess drip off, then return to the baking sheet. Continue with the remaining truffles (both sizes) until all are all coated. If the coating cools to room temperature during the dipping process, microwave it in 20-second intervals to reheat. Reserve the leftover white coating to use as glue for the tails, ears and feet.
- For the heads: Dip the bottoms of 2 bunny ears in the leftover white coating, place on top of a small truffle and hold in place until the coating sets, about 15 seconds. Snip a very small tip off the corner of each bag of icing. Pipe a small pink heart for a nose on the front (face) of the truffle. Pipe a pair of eyes and mouth using the black royal icing. Repeat with the remaining small truffles.
- For the bottoms: Dip the cut side of a marshmallow tail in the leftover white coating. Place the tail on top of one of the large truffles and hold in place until the coating sets, about 15 seconds. Dip the cut sides of two marshmallow feet in the leftover white coating. Position them on the truffle below the tail and hold until set in place. Use the pink royal icing to pipe a large oval on the top each foot and 3 small circles underneath for toes. Repeat with the remaining large truffles.
- Return all the truffles to the refrigerator to set, about 10 minutes. Serve chilled.