Recipes by Colin Asuncion. Follow him on TikTok and YouTube.

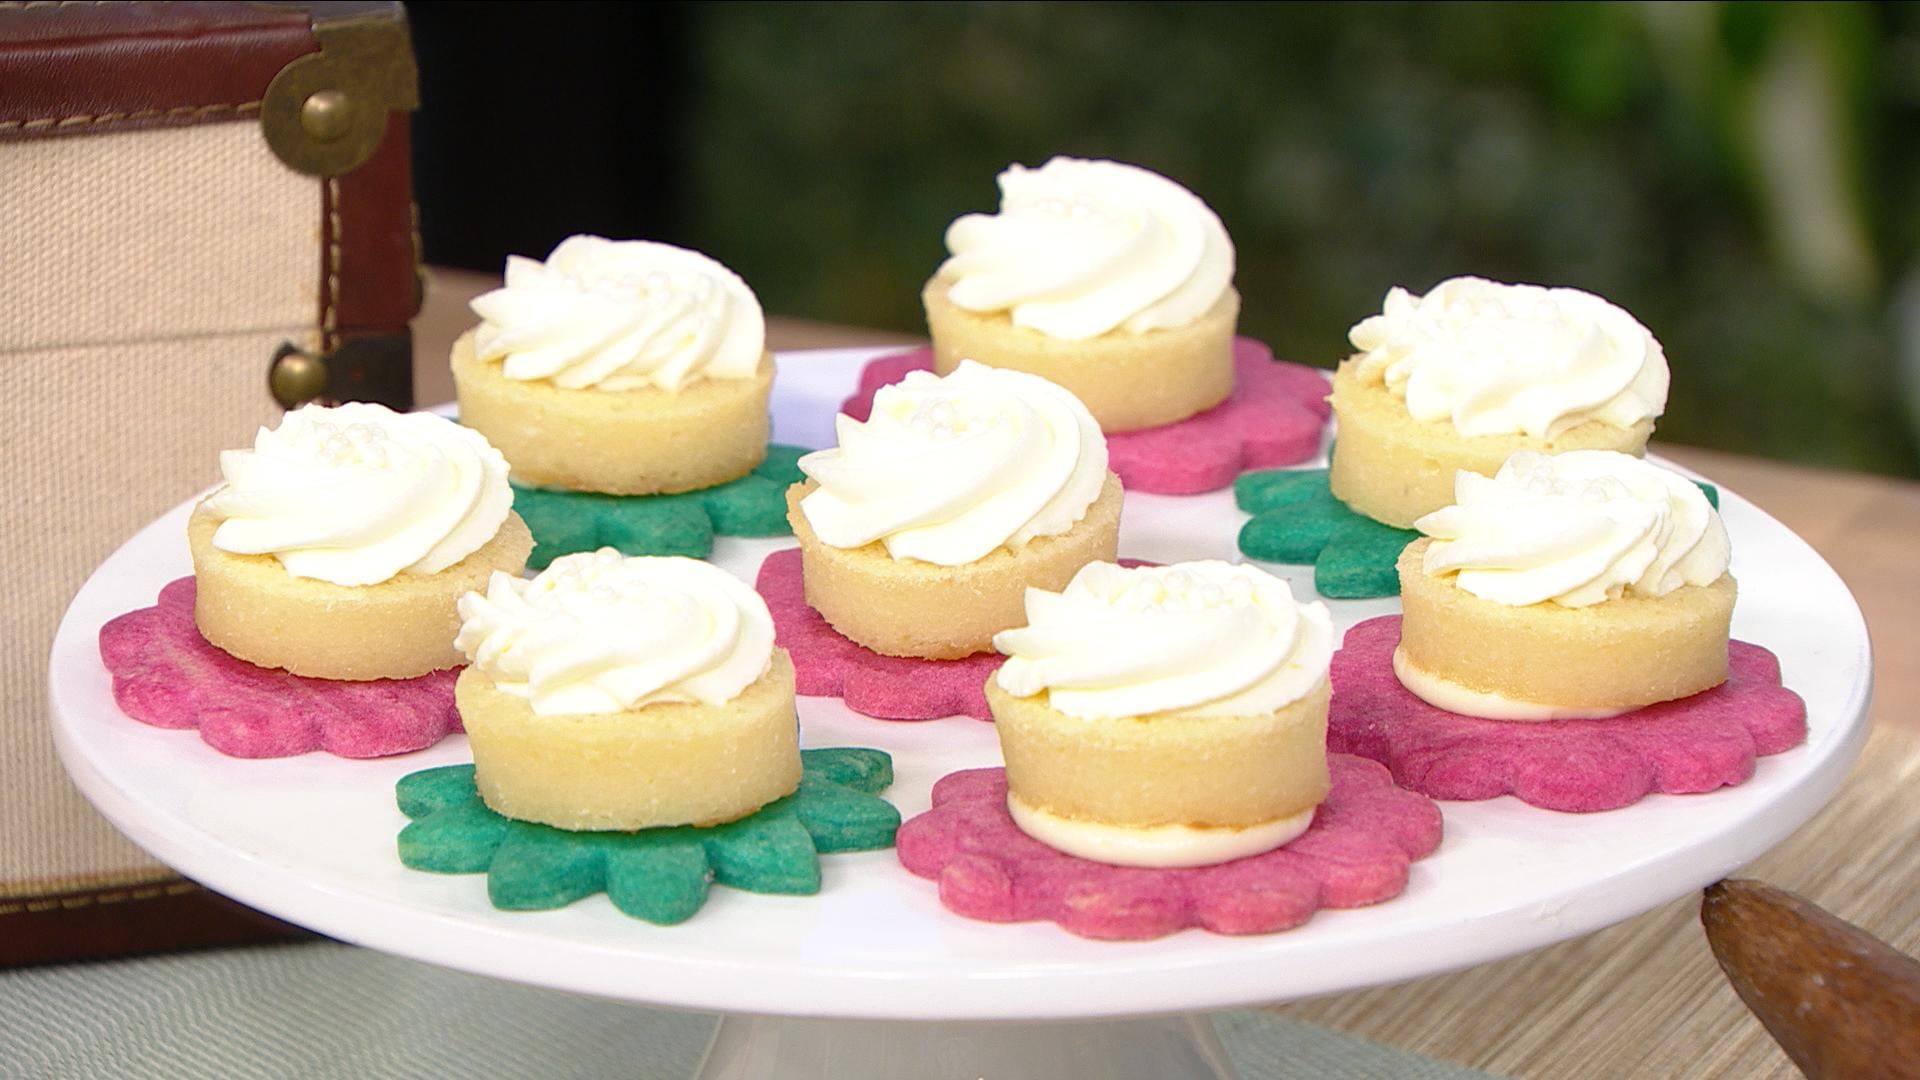
Cassava Blossoms
Inspired by the Philippines, this dessert combines a traditional Filipino cassava cake layer with a shortbread base and cream cheese frosting, decorated to look like a gorgeous tropical flower.
Ingredients
Cassava Cake Layer
- 2 packs grated cassava (about 2 lbs)
- 2 cups coconut milk
- 1/2 cup evaporated milk
- 2 eggs room temperature
- 1/4 cup butter melted
- 1/2 cup condensed milk
- 1 cup granulated sugar
Shortbread Cookie Base
- 1 cup room temperature unsalted butter
- 1 cup granulated sugar
- 1 teaspoon vanilla extract
- 1 room temperature large egg
- 2 teaspoons baking powder
- ½ teaspoon salt
- 3 cups all purpose flour, plus more for dusting work surface
- Food colouring
Cream Cheese Frosting
- 8oz (one brick) cream cheese, room temperature
- ½ cup (one stick) unsalted butter, room temperature
- 1 cup icing sugar
- 1 tsp pure vanilla extract
- Optional toppings: sprinkles or shredded coconut
Directions
Cassava Cake Layer
- Preheat oven to 350 degrees. Grease a 9x13 baking pan with butter and set aside.
- Place grated cassava into a large mixing bowl and remove any extra hard fibres by hand. Pushing the cassava against the side of your bowl with a flexible spatula can help you see the hard fibres.
- Once the hard fibres have been removed, add in all the other ingredients except the coconut milk. Mix until well combined.
- Add the coconut milk and mix again until completely combined.
- Pour batter into the prepared baking pan and bake for 1 hour. A cake tester inserted into the centre of the cake should come out clean once fully baked. Set aside.
Shortbread Cookie Base
- Make cookies: Preheat oven to 350°F. Set rack at middle position. Line baking sheet with parchment paper.
- Using a hand mixer or stand mixer with the paddle attachment, cream butter and sugar together until smooth, at least 3 minutes.
- Add vanilla extract and egg and beat for another minute.
- In a separate bowl, combine baking powder, salt, and flour. Whisk until well combined.
- Add dry ingredients to wet ingredients and mix on medium until well incorporated and a dough forms and comes together. Add food colouring and mix just until the colour is evenly incorporated.
- Turn out dough onto a floured surface and knead for a few seconds. Dough should hold together easily.
- Roll out and cut blossom shapes with a cookie cutter. Carefully transfer cookies onto a baking sheet. If cutting out cookies in different sizes, place similarly sized cookies on the same baking sheet so you can control bake time for each size.
- Bake for 12-14 minutes until edges are slightly golden. Bake time will vary depending on the size of your cookies, so monitor this closely.
- Remove from oven and cool on a rack. Set aside.
Cream Cheese Frosting
- Combine all ingredients in bowl of stand mixer fitted with a paddle attachment, or a large mixing bowl with a hand mixer. Mix on high until smooth.
Assembly instructions
- Using a round cutter that is smaller than your cookie blossoms, cut circles out of the cassava cake. Set aside.
- Take one of your cookie blossoms and top with a small dollop of cream cheese frosting. Place a round of cassava cake on top of this, and then pipe a rosette of cream cheese frosting on top.
- Optional: Top with sprinkles or shredded coconut for additional decoration. Serve immediately, or store in fridge, covered.

Lemon Possets
Lemon posset is a classic British dessert that’s unbelievably simple and luxuriously creamy.
Ingredients
- 2 cups heavy whipping cream
- 2/3 cup granulated sugar
- 6 Tbsp lemon juice
- Optional topping: berries and mint leaves
- 10 lemons (for serving)
Directions
- In a small saucepan, heat the cream and sugar on medium high, stirring occasionally, until sugar is dissolved. Bring to a boil, then bring heat down to medium and boil for 5 minutes.
- Remove saucepan from the heat and add in the lemon juice. Cool mixture for 10 - 15 mins. Strain mixture through a fine mesh sieve into a large pitcher or measuring cup.
- Cut reserved lemons in half lengthwise and scoop out the flesh and membrane from the fruit.
- Fill each lemon half with the cooled posset mixture.
- Refrigerate for at least 3 hours. Garnish with berries and mint leaves and serve.

Spiced Tres Leches Cake
The tres leches cake (Spanish for “three milks cake”) is very popular in Mexico. It’s a light sponge cake soaked in a sweet milk mixture and topped with whipped cream.
Ingredients
Cake
- 2 ¼ cups all-purpose flour
- 1 tbsp baking powder
- ½ tsp salt
- 2 tsp ground cinnamon
- 1 tsp ground cardamom
- 1 tsp ground ginger
- ¼ tsp ground nutmeg
- ¼ tsp ground cloves
- 3 eggs
- 1 ¾ cups sugar
- 1 tsp vanilla extract
- 2/3 cup canola or vegetable oil
- 1 cup lukewarm whole milk
Milk Soak
- 2 cups evaporated milk
- 1 cup sweetened condensed milk
- ¼ cup dulce de leche or salted caramel sauce
Topping
- 2 cups whipping cream, cold
- ¼ cup icing sugar
- 1 tsp vanilla extract
- Optional toppings: toasted shredded coconut, ground cinnamon, sprinkles, cinnamon sticks, star anise
Directions
- Prepare cake: Grease a glass or metal 9x13 baking pan with nonstick cooking spray. Preheat oven to 325 degrees.
- In a bowl, combine the flour, baking powder, salt, and spices. Set aside.
- In another bowl, beat the eggs, sugar and vanilla at high speed with an electric mixer for about 10 minutes or until the mixture triples in volume and forms a ribbon. Drizzle in the oil while beating.
- At low speed, add the dry ingredients alternately with lukewarm milk, beating just until smooth. Pour the batter into the pan.
- Bake for 40-43 minutes or until a toothpick inserted in the centre of the cake comes out clean. Let cool completely in the pan.
- While the cake is cooling, make your soaking liquid by combining the evaporated milk, condensed milk, and dulce de leche in a small saucepan and warming over medium low heat until the dulce de leche is completely dissolved and the mixture is gently simmering.
- Remove from heat and let cool until room temperature.
- Using a toothpick or skewer, poke holes all over the cake surface. The more, the better. Be sure to not tear up the cake in the process, but ensure your holes are evenly spread out.
- Pour half the milk soak all over the cake by slowly drizzling the liquid across the surface of the cake. Place back in the refrigerator for one hour before repeating with the remaining liquid. Refrigerate again for at least three more hours, or overnight.
- Whip the whipping cream on high with the icing sugar and vanilla extract until stiff peaks form. Cover your soaked cake with whipped cream by spreading it over the top with a spatula, or piping it in rosettes with a piping bag and piping tip.
- Optional: top with toasted shredded coconut or a dusting of ground cinnamon. Slice and serve cold directly from baking pan.

Lychee Mango Jelly Cups
Inspired by Taiwanese lychee jelly, this layered dessert cup has sweet and floral lychee jelly and a mango jelly layer.
Ingredients
Lychee Jelly
- 2 (7g) envelopes unflavored gelatin (14g in total)
- 1/4 cup room temperature water
- 1/2 cup hot water
- 2 cups lychee nectar
- 1/4 cup sugar
- 1 cup finely chopped lychee fruit (canned or fresh)
Mango Jelly
- 2 cups ripe mango puree
- 1 cup water
- 1/3 cup sugar
- 2 Tbsp unflavored gelatin powder
- 1 Tbsp lemon juice
Directions
Lychee Jelly
- Pour 1/4 cup of room temperature water into a small bowl. Add the gelatin and whisk until incorporated. Set aside for five minutes to let the gelatin bloom.
- In a small saucepan, combine the remaining hot water, lychee nectar, and sugar. Heat the mixture over medium heat, stirring until the sugar is dissolved and the mixture is hot but not boiling.
- Remove the pan from the heat and whisk in the reserved gelatin, making sure there are no lumps.
- Pour the mixture through a fine mesh sieve into a liquid measuring cup to catch any unmelted lumps of gelatin. Skim off any bubbles on the surface with a fine mesh strainer. Slightly cool for about 5-10 mins.
- Place a tablespoon of chopped lychee fruit into the bottoms of your cups / ramekins. Pour liquid mixture into each cup until each is ¼ full (amount will vary depending on the size of your cup). Place cups in the refrigerator for at least 2 hours to firm up.
Mango Jelly
- Strain mango puree for a smooth texture.
- In a small bowl, sprinkle the gelatin powder over 1/4 cup of cold water. Set aside for 5 minutes.
- In a saucepan, combine the remaining water and sugar on medium low. Heat until the sugar dissolves.
- Add the mango puree, lemon juice, and bloomed gelatin to the saucepan and reduce heat to low. Stir until the gelatin is completely dissolved. Do not boil.
- Remove from heat and let cool for 5 minutes. Pour a layer of this mango mixture on top of your chilled lychee jelly cups. Refrigerate for another 2 hours or until completely set. Optional: Top with chopped fruit and/or whipped cream.

Napoleon Cake
The Napoleon cake is sweetened pastry cream with puff pastry layers that is a popular holiday treat in Ukraine, Poland, and the Baltic states.
Ingredients
- 4 cups milk
- 1/2 cup white sugar
- 4 egg yolks
- 2 eggs
- 1/2 cup cornstarch
- 2/3 cup white sugar
- ¼ cup butter
- 2 teaspoons vanilla extract
- 2 packages store-bought puff pastry, thawed but still cold
- Fresh berries for topping
Directions
- Preheat your oven to 400 degrees. Roll out the puff pastry gently with a rolling pin until it is a bit thinner. Cut out 6 or 8-inch rounds with a paring knife, using a cake pan or a plate as a guide - you will need 6 - 8 rounds in total;
- Transfer the rounds to parchment lined baking sheets. Using a fork, poke holes across the surface of the dough (this is called docking). Bake the rounds in the oven for 5 - 7 minutes, or until golden. Remove from the oven and trim the edges of the rounds while they are still warm by using a paring knife so the rounds are even.
- Bake any scraps of dough you have left - you will need these later.
- Make pastry cream: In a saucepan, combine milk and 1/2 cup sugar. Heat over medium until just boiling.
- Meanwhile, in a bowl, whisk together egg yolks and whole eggs. In a separate small bowl, mix remaining sugar and cornstarch, then whisk into the eggs until smooth.
- Slowly drizzle the hot milk into the egg mixture, whisking constantly to avoid curdling. Return the mixture to the saucepan and cook over medium heat, stirring constantly, until thickened and bubbling.
- Remove from heat and stir in butter and vanilla until fully incorporated.
- Transfer to a heatproof container and press plastic wrap directly onto the surface. Chill in the fridge until cold, at least one hour.
- While the pastry cream is chilling, take the baked dough scraps and crumble them into crumbs. Set aside.
- Assemble cake: Spread a small dab of pastry cream on a serving platter. Place the first pastry layer on top to secure it. (Optional) Place an adjustable cake ring around the layer for straight edges.
- Reserve 1 cup of pastry cream for the sides and refrigerate it.
- Spread a generous layer of pastry cream over the pastry layer. Repeat layering cake and pastry cream, finishing with custard on top. Sprinkle the pastry crumbs over the top to prevent drying.
- Let the cake sit overnight in the refrigerator.
- If using a cake ring, run a knife around the edge and remove it. Spread the reserved pastry cream over the sides. Press pastry crumbs onto the sides and sprinkle more on top.
- Garnish with berries and additional pastry cream, piped into rosettes on top of the cake (optional). Refrigerate until ready to serve. Serve cold or room temperature.